Fresh Corn and Cilantro Salsa

Where has the summer gone? As the last of the warm-weather produce disappears from the market, I’m finding myself getting mentally prepared for broccoli rabe and butternut squash. But hey, I honestly can’t complain about those prospects.

With summer wrapping up, I thought I’d share a recipe for corn salsa. (Hopefully some of you are lucky enough to get your hands on some fresh late-season corn!) The recipe is inspired by the corn salsa at Chipotle, which I adore. I love how the sweet corn and spicy jalapeno is accented by the fresh lime juice. It’s a nice respite from the old canned tomato salsa routine. And to top it off, it’s incredibly easy to make.

Fresh corn is always the best, but you can substitute with frozen in a pinch. Use this salsa atop everything from chips and quesadillas to chicken and fish. It adds a nice crunch to any dish and a healthy kick of spiciness.

My adoration of Chipotle food doesn’t stop with the corn salsa. I’ve tried to actually replicate the entire Chipotle burrito bowl at home with very good results. To make the rice, I mix caramelized onions, cilantro, and fresh lime juice into cooked jasmine rice. Then I pile on the chicken, lettuce, guacamole, and black beans. Finally, I top it all off with this salsa. Amazing.

Even though Chipotle is a giant company with franchises around the world, I respect their efforts to disrupt the broken fast food system. Last year, the company launched an unbelievable ad campaign to champion their commitment to sustainable food. Some called it phony; others thought it was brilliant. The commercial almost brought me to tears, so that should give you some indication of where I stand on the issue.

In case you missed it, here you go!

Continue reading

The Best of Oahu (A Food Lover’s Perspective)

Hawaii is like a second home to me. I have family there, and spent most of my childhood summers on Oahu. The island holds a special place in my heart with its vibrant culture, amazing food, and some of the most beautiful beaches in the world. After I graduated from college and vacation time became scarce, I stopped joining my family on our annual trips.

This past summer was the first time in five years that I’ve been able to make it back to Oahu. It’s funny how returning to the places you knew as a child can evoke such strong feelings and memories. For me, the familiar flavors of malasadas and shaved ice bring back vivid memories of time spent with my family and good friends.

I thought I’d share a few of my favorite places with you–both old and new. These are not the type of establishments you’ll find gracing the glossy pages of a travel magazine. (In fact, don’t be alarmed if you look around and realize that you’re the only non local within 25 feet.) These are hole-in-the-wall, off-the-beaten-path, no-frills kind of establishments where good food is the only guiding principle. No hype, and completely casual. Just as it should be in Hawaii.

1. Leonard’s Bakery

Leonard’s is an Oahu institution, with its freshly-baked malasadas (Portuguese donuts) and pao doce (Portuguese sweet bread). The malasadas are filled with everything from custard and chocolate to jams and haupia (coconut pudding). The haupia malasada will always hold a special place in this girl’s heart!

2. Nu’uanu Okazya

This tiny hole-in-the-wall establishment features a dizzying array of Japanese and Hawaiian food. Grilled saba, chicken long rice, veggie tempura, nishime, onigiri, furikake musubi…the list goes on and changes on a daily basis. I can only describe it as a “choose your own adventure” bento establishment. You walk up to the counter, point at the food you want, and basically create your own personalized bento. My recommendation is to get your bento and head to the beach to get your eat on.

3. Ice Garden

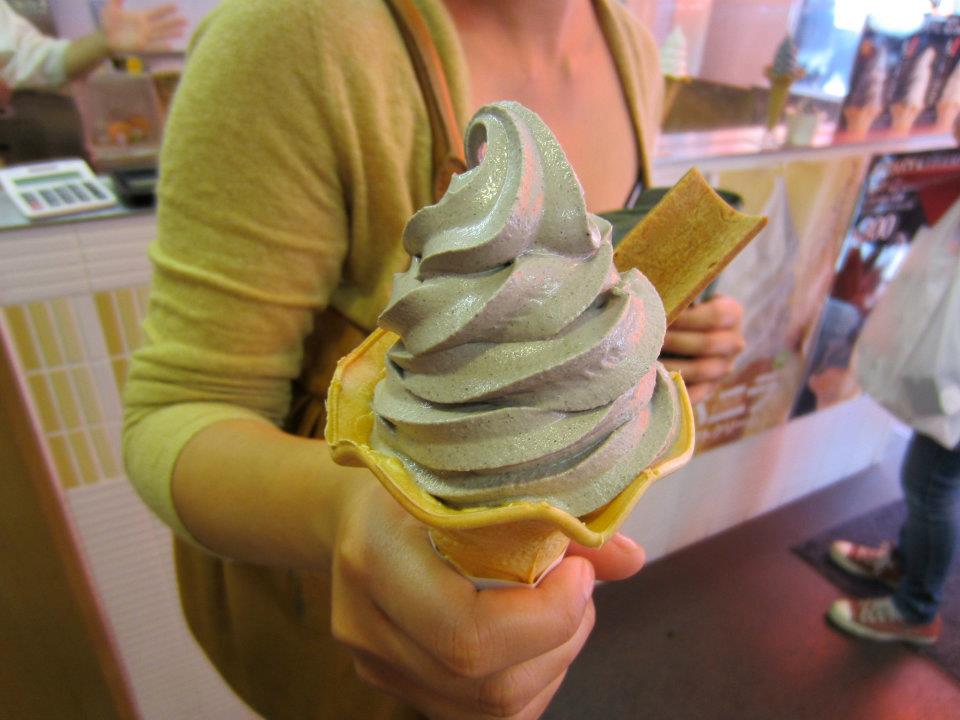
Shaved ice is really big in Hawaii. I mean, seriously big. While Matsumoto on the North Shore is definitely the most popular shaved ice establishment, I think Ice Garden wins for the most unique flavor combinations. My favorite is the mochi, flan, and evaporated milk shaved ice. Don’t knock it ’til you try it! Service here is extremely slow, but rest assured that the finished product will be delicious.

4. Fresh Coconut at the Aloha Stadium Swap Meet

I know coconut products are all the rage these days, but I’ve been geting my coconut on at the Aloha Stadium Swap Meet since the nineties, folks. It’s all about the fresh coconut. I highly recommend the Aloha Stadium Swap Meet in general if you’re looking for cheap souvenirs to bring home. While you’re there, look for the tiny older man selling fresh coconuts out of the back of his pickup truck. You’ll identify him by his giant machette and notable lack of English. You’re just going to have to trust me on this. Once you drink all the coconut water, bring back the shell and he’ll cut it in half so you can dig into the meat.

5. Kim Chee

This is the quintessential Korean BBQ food that is so popular in Hawaii. Kim Chee is fast, delicious, and easy on the budget. There are a few locations throughout the island, but this location happens to be my favorite.

6. Weekend Buffet at Hakkei

If you’re looking for a very traditional Japanese buffet, this is it. This is nothing like an American-style buffet with endless choices and mass-produced quality. The food choices are slim, but the quality is outstanding. The brunch is offered on weekends and costs $15. I highly recommend making reservations in advance.

7. Aiea Bowl

When my uncle told me that he wanted to take us to a bowling alley for dinner, I thought he was crazy. Little did I know that this bowling alley serves up some of the best local food around. Their fried chicken is outstanding, as is their furikake crusted ahi. Aiea Bowl is also known for their baked goods, including the famous lemon crunch cake. Make no mistake though, this is still a bowling alley and there is nothing glamourous about that. But if you’re looking to check out the local scene and try some good food, head to Aiea Bowl.

8. Macky’s Sweet Shrimp Truck

The North Shore is known for its delicious shrimp trucks, and Macky’s happens to be my favorite. The best dish is the garlic butter shrimp–hands down.

Cold-Brewed Vietnamese Iced Coffee

When it comes to iced coffee, I’m convinced that cold brewing is the winning method. Pouring piping  hot coffee over ice generally results in a flavorless, diluted mess. That has been my experience anyway. Cold brewing doesn’t require any heat at all–just a little time and patience. 24 hours of patience, in this case.

I will spare you from my full blown cold-brewing spiel. (If you’re interested, you can just mosey on over to this post that I wrote last summer from Montana) But I will say that this method works especially well for Vietnamese-style iced coffee, which requires very concentrated coffee to stand up to the sweet condensed milk.

Traditional Vietnamese iced coffee is of course brewed using a small metal drip filter, or a cà phê phin. I know I badmouth kitchen unitaskers all the time, but I do own a cà phê phinActually, I own four–not gonna lie. I love them! They make the best Vietnamese iced coffee on the planet. They also take for eternity to extract mere drops of glorious coffee goodness from the grinds. It’s basically like watching water boil.

Sometimes you just want a little instant gratification, which is why I like to keep a jar of concentrated cold-brewed coffee in the fridge. When you want a Vietnamese-style iced coffee, just bust this stuff out, and mix with sweetened condensed milk, normal milk, and ice. Easy peasy.

If you’re entertaining, this is also a great way to prepare multiple iced coffees quickly. On a side note, Trader Joe’s now sells sweetened condensed milk in a squeeze bottle. GENIUS.

This recipe is originally from Food & Wine magazine. It calls for 2 ounces (about 4 tablespoons) of sweetened condensed milk, which was a little too sweet for my tastes. I recommend starting out with about 3 tablespoons and adding more to taste. You can always add more sweetness, but you can’t take it away once it’s in there! I think the ratios that Food & Wine magazine used are pretty spot on. But feel free to play around with the measurements until you make your perfect Vietnamese iced coffee.

Cold-Brewed Vietnamese Iced Coffee
Adapted from Food & Wine
Yield: About four drinks

For the coffee concentrate:

  • 4 1/2 cups cold water
  • 1/2 pound coarsely ground dark-roast coffee

For each drink:

  • 3/4 cup coffee concentrate
  • 3-4 tablespoons sweetened condensed milk (add more to taste)
  • 1/2 cup milk
  • Ice
  1. Brew the coffee concentrate: In a bowl, stir the cold water into the coffee. Cover and let stand at room temperature for 24 hours. Strain twice through a coffee filter, a fine-mesh sieve, or a sieve lined with cheesecloth. (Don’t forget to compost the spent grinds!) The concentrate can be refrigerated for up to 1 week in an airtight container.
  2. Make the drink: Pour condensed milk into a tall glass. Add the coffee concentrate and milk. Stir well. Top with ice.

Kickstarter Projects I Love

Happy Monday, everyone! By now, many of you have probably heard of the website Kickstarter which helps entrepreneurs raise funds for their creative projects. I love this concept because it disrupts the old school funding model–a space that used to be reserved for venture capitalist firms and rich private investors. Now normal folk like me can contribute funds to everything from documentaries to macron bakeries.

You can pledge any amount of money to the projects you back. In return, you receive some type of gift related to the entrepreneur’s project. What’s not to love! Here are a few of my favorite current Kickstarter projects that I either support or have personally contributed to.

Jacobsen Salt Co.  {High-quality finishing salt harvested on the Oregon coast}

Forage Kitchen {A hub for the Bay Area food community, and a home for artisan food makers}

Kinkajou {An easy to use bottle cutter that can turn used glass bottles into works of art}

KONE Coffee Filter + Brewing System  {Photo etched stainless steel filter and ceramic brewer set}

Nomiku  {An affordable and easy way to cook food sous vide}

Coffee Roasting Cart {Coffee roasting cart + cold press espresso)

Matcha (Green Tea) Ice Cream

I have a confession to make. This might come as a surprise coming from someone who claims to love food. I don’t really like ice cream. There, I said it. It’s often just too rich, too creamy, and too cloyingly sweet for my tastes. Blasphemous, I know! I’ve always been more of a frozen yogurt kind of girl for this reason. Most ice cream recipes use eggs to create a creamy, custard base. I usually avoid using eggs entirely. This not only takes the fuss out of ice cream making, it also yields a much lighter texture.

I was in frozen dessert heaven when I was in Japan. The ice cream and frozen yogurt was complex in flavor and not too creamy. With flavors like black sesame & honey, matcha, cherry blossom, and sweet tofu, my sister and I made it our mission to try every single flavor we couldn’t get in the U.S.


Oh, don’t mind me while I devour this black sesame & honey fro-yo and every other flavor in this store…I’m an Amerikajin!

While I loved all the novelty flavors that I tried on my trip, my favorite will always be matcha ice cream. Matcha is just finely milled green tea leaves that’s often used in Japanese tea ceremonies. It’s available at Asian grocery stores and even some specialty grocery stores like Whole Foods. Matcha varies greatly in quality and price. If it’s available, look for “culinary grade” or “culinary quality” matcha, which tends to be a little cheaper.

I found this recipe on a wonderful blog called Just One Cookbook. Nami posts delicious recipes for authentic Japanese dishes like Tonkatsu and the ever popular Japanese Beef Curry. She does an amazing job demystifying Japanese cooking techniques, and her photography is gorgeous. I can literally get lost on her site for hours!

I love this matcha ice cream recipe because it comes closest to the stuff we ate in Japan. The matcha lends a slightly bitter note that complements the sweetness of the ice cream. And as always, there are no eggs in this recipe, so the texture is a little less creamy, but no less delicious.

Hope you enjoy!

Matcha (Green Tea) Ice Cream
Yield: About One Pint
Recipe from Sweets by Sillianah via Just One Cookbook

  • 2 cups half and half (I used 1 cup of milk and 1 cup of heavy cream)
  • 3 tablespoons 100 percent green tea powder (matcha powder)
  • 1/2 cup sugar
  • pinch of salt
  1. In a large sauce pan whisk together the half and half, green tea powder, sugar and salt. Heat the mixture until it comes to a full boil. Keep whisking until mixture starts to foam, then remove from heat.
  2. Refrigerate the mixture until completely chilled.
  3. Churn for 15-20 minutes in ice cream maker, according to manufacturer’s instructions.
  4. Transfer ice cream into an airtight container and freeze until hard. (At least three hours)

A Trip to Japan

Hello, again! I’m finally back from my trip to Japan. Jet lagged and completely loopy, but back nonetheless. (Is this real life???) I’ve had a lot of great travel experiences in my day, but this was definitely a trip to remember.

It all started when my grandma turned 80 a couple months ago and wanted to visit some old friends in the Japanese countryside. As a gift, my family bought her a ticket to Japan. Unfortunately my grandma is not currently in the best health–despite her feelings on the topic. So my sister and I traveled to Japan with her and spent some time in a town called Fujioka in the Gunma prefecture, about three hours outside of Tokyo. My sister and I then traveled to Tokyo, Kyoto, Nara, and Osaka before rejoining with our grandma in the countryside. It was a pretty last minute trip, but one that I’ll never forget. We had the most hospitable friends in both Fujioka and Tokyo, which made the trip extra special.

Here are a few snapshots from our trip, most of which are of food. Would you expect anything else from me?

Our first home cooked breakfast in the countryside. Saba shio, miso, tamago, hijiki, gohan, nori….and some clam thing that I can’t pronounce, but tasted mighty delicious!

Our friends took us to this tiny sashimi shop on the side of the road in Fujioka. They chose the fish they wanted and the shop owner cut and beautifully organized the sashimi on a platter to take home.

Our friends also took us to an amazing all you can eat shabu shabu restaurant in Fujioka. Side note: the beer was all you can drink as well.


We stayed in Shinjuku while in Tokyo–which I highly recommend!


We took sushi lessons near the famous Tsukiji fish market in Tokyo. I made the plate above full of rolls and nigiri. If you go to Tokyo and love to cook, I highly recommend walking around the Tsukiji outer market and taking a cooking class.


Obento on the Shinkansen on the way to Kyoto.


If you love to cook, you have to swing by Aritsugu in Kyoto. The store itself is tiny, but Arisugu is very well-respected for their handmade knives, pots, scissors, and other utensils. The best part is that you can get anything engraved on the spot. Not by a machine, but by an actual artisan–it’s seriously amazing. We bought a knife for my dad and had our last name engraved in Japanese on it.


Tasting green teas at Ippodo, one of the oldest tea shops in Kyoto.


Love the Shinkansen!


Quail egg and yam sushi at a conveyer belt sushi place in Kyoto Station. I don’t know the name of this place, but it’s across the way from McDonalds in Kyoto Station, if that helps. Every plate (yes, every single one) is 137 yen, about $1.80 US. We nommed here on multiple occasions, I can’t lie.


Shinto shrine in Kyoto.


Takoyaki in Osaka! “Tako” means octopus in Japanese and takoyaki are basically octopus dumplings topped with everything from mayo and teriyaki sauce to poached eggs and green onions.

Ceviche de Camarón

Ceviche is one of my favorite warm weather dishes. It’s so basic, yet incredibly tasty. Ceviche is traditionally made out of raw seafood that is marinaded in lemon or lime juice until the proteins are “cooked.” Additional ingredients such as avocado, red onion, cilantro, tomato, and cucumbers are mixed in.

Like most popular dishes, the exact origin of ceviche is in dispute. Every country and region seems to have its own distinct contributions to the dish. When I was in Peru, we ate ceviche with giant corn kernels and purple potato. At my local Mexican food joints, they serve it tostada-style, atop a fried corn tortilla. This is my favorite way to eat ceviche–probably because it is what I grew up on. I love how the salty crunchiness of the shell complements the tangy ceviche.

Ceviche de camaron (shrimp ceviche) is a great way to ease your way into the wonderful world of ceviche. Traditionally, the raw seafood is “cooked” by the citrus juices and never touches any form of heat. I am totally fine with this method when it comes to fish. However, when it comes to shellfish, there is much less room for error because it goes bad so quickly. A quick poach will do that trick, and the results are still very tasty. Cooking the shrimp ahead of time will also cut down on marination time so you can enjoy your ceviche faster!

I really enjoy the balance of salty, sweet, and tangy flavors in this dish. While most people don’t do this, I like to add a couple pinches of sugar to balance out the flavors. This is just personal preference though. I found that a lot of people will use ketchup to achieve that mild sweetness. I couldn’t bring myself to add ketchup to my ceviche this time around. But if you find yourself sitting there thinking, “wow, this just needs that ONE last ingredient to make it super delicious…,” just know that it’s probably ketchup. And I won’t judge you.

As I mentioned, there are so many different ways to enjoy ceviche. If you want to make your own tostada shells, check out this tutorial from Simply Recipes. You will want to make about 2-3 shells per person. If you don’t feel like making tostada shells, use store-bought tortilla chips and treat the ceviche like one big, delicious dip. You can also tear pieces of crusty bread off the loaf and pile on the ceviche. Some people even eat it with saltines which I don’t necessarily endorse.

Hope you enjoy, and happy Cinco de Mayo!

Ceviche de Camarón
Yield: About 4 servings

  • 1 pound medium shrimp, peeled and deveined
  • 1/2 cup lime juice
  • 1/2 cup lemon juice
  • 1/2 cup red onions, finely chopped
  • 1-2 serrano chiles (depending on how hot you like it), ribs and seeds removed, minced
  • 1/2 cup cilantro, chopped
  • 1 ripe avocado, peeled, seeded, and diced into ½” chunks
  • 1 cup tomatoes, seeds removed and diced
  • 2 tablespoons extra virgin olive oil
  • Kosher salt
  • Sugar (optional)
  • For tostada shells, check out this Simply Recipes tutorial. Make about 2-3 shells per person.
  1. Place a 1-gallon stockpot over high heat and fill with 2 quarts of water. Season the water with 1/4 cup of salt and bring to a boil. Once the water comes to a boil, add the shrimp to the pot and immediately turn off the heat. Let the shrimp sit until just cooked through, about 3 minutes. Remove the shrimp from the water run under cold water to stop the cooking. Pat the shrimp dry with a paper towel.
  2. Chop shrimp into 1/2″ pieces and place in a medium-sized stainless steel or ceramic bowl. Add the lemon juice, lime juice, red onion, and chiles. Refrigerate for 1 hour.
  3. Stir the tomato, avocado, cilantro, and olive oil into the shrimp mixture. Add salt and sugar to taste, if desired.
  4. If serving tostada-style, use a slotted spoon to lift the ceviche out of the liquid and place on top of tostada shell.

Life in San Francisco (Thus Far)

Our first month at the new apartment has flown by! I thought I’d share a few random snapshots of our first month in the city.

The kitchen stand in the dining nook.

Cali checking out Golden Gate Park. Which is within walking distance from our apartment!

Playing with my new pasta maker attachment.

Jeff and Cali at Lands End.

The giant sampler at Russian River Brewing Company.

Bi-Rite creamery in the Mission.

Off The Grid at Fort Mason. Every Friday, a bunch of food carts throughout the city gather in the Marina. It’s amazing.

And I leave you with a classic.

No-Fail Banana Bread

Last week we had our first official guests come to visit us in San Francisco. Rebecca and Jason were our best eating/drinking buddies in Seattle, and we continued the tradition down here in the Bay Area. We went a wee bit crazy to say the least. During their three night stay, we hit up Russian River Brewery, Nopa, Nihon, Bourbon & BranchChile Pies & Ice Cream, and Chez Panisse–to name a few. We had a great time exploring our new city with them, but I’m still detoxing as we speak.

I bought some bananas before our guests came thinking that some fruit would help offset our eating and drinking extravaganza. Lo and behold, nobody touched them. By the time we took Jason and Rebecca to the airport, my well-intentioned bananas were looking pretty brown and generally unappetizing. This could only mean one thing: banana bread tiempo!

Everyone who loves to cook has a favorite banana bread recipe in their repertoire. I fussed around for years trying to find my idea of the perfect banana bread. The kind that is so deliciously moist and dense that it could be served as a legitimate dessert with a dollop of whipped cream. My search ended the day I found this recipe. The addition of cream fraiche (or sour cream) is completely brilliant. I haven’t tried another recipe since.

I’ve always made this recipe with good old tried and true canola oil. But coconut oil has really been having its moment lately, so I thought I’d give it a shot. Coconut oil has gotten a bad rap in the past, but minimally processed and virgin oil is said to have some very good health benefits when used in moderation. This is a great article on the topic from Melissa Clark, in case you’re curious.

If you use virgin coconut oil, like the one I bought from TJ’s, it will give off a slight coconut flavor when baked. This is great for people who love coconuts (like me!), but not so awesome if you don’t. Also, virgin coconut oil does not come in liquid form like we’re used to. You literally have to scoop it out of the jar, almost like peanut butter. When you bake with it, melt the oil and let it cool before using. This way it will get evenly distributed into the batter.

The coconut oil gave the bread a subtle, nutty complexity which I absolutely loved. Just when I didn’t think I could l love this recipe any more, coconut oil has to come and shake things up.

What do you think about using coconut oil in baked goods?

Have you used it in savory dishes too?

Some people swear by it. And based on my minimal experience, I’d say it’s pretty magical.

No-Fail Banana Bread
Adapted from Flour’s Famous Banana Bread
Yield: One Loaf

  • 1 2/3 cups all-purpose flour
  • 1 teaspoon baking soda
  • 1/4 teaspoon ground cinnamon
  • 1/2 teaspoon salt
  • 1 cup plus 2 tablespoons sugar
  • 2 eggs
  • 1/2 cup virgin coconut oil, melted and cooled
  • 3 1/2 bananas, very ripe, mashed
  • 2 tablespoons creme fraiche or sour cream
  • 1 teaspoon good quality vanilla extract
  • 2/3 cup walnuts, toasted and chopped (optional)
  1. Preheat oven to 350°F. Line the bottom of a loaf pan with parchment paper and lightly grease the sides of the pan.
  2. Sift together the flour, baking soda, cinnamon, and salt. Set aside.
  3. In a separate bowl, beat sugar and eggs until light and fluffy, about 10 minutes. Drizzle in oil. Add mashed bananas, creme fraiche, and vanilla. Fold in dry ingredients and add walnuts if using.
  4. Pour  batter into the lined and greased loaf pan and bake for about 45 minutes to 1 hour.

Maple Pecan Olive Oil Granola

Hello again, dear readers! It has been a while but I have a really good excuse for my absence. We finally found a place to live! This past week has just been a whirlwind of unpacking boxes and trolling One Kings Lane for furniture. The first couple days were very stressful, but we’re finally beginning to feel settled. Some people can move from one place to the next with grace and ease. I’m definitely not one of them. There’s nothing more unnerving to me than bare walls and an empty fridge. But I guess that’s just process of turning a house into a home. Little by little I think things are starting to come together.

While our move wasn’t all sunshine and rainbows, our new place is definitely growing on me. It has a lot of old San Francisco charm and two (yes, TWO) eating areas. We now have a dining nook, and a formal dining room. We ate dinner every night on our coffee table at our old place, so this is a big deal for us! I have a feeling we will be very happy here.

I wanted to make a batch of granola that could sustain us through all the heavy lifting and grumpy moments. Olive oil granola recipes have been making the rounds lately, so I thought i’d give it a shot. I got some delicious olive oil in my Foodzie box last month and this seemed like the perfect opportunity to bust it out. I decided on this Food52 recipe–the perfect mix of nuts, coconut, and oats, balanced with maple syrup and olive oil. Needless to say, the granola never even lasted for the actual move–my family ate it all within 48 hours.

This granola is great on its own, but especially magical sprinkled on top of yogurt. Between the pepitas, sunflower seeds, and olive oil, I think it’s safe to say that this granola is not only delicious but also pretty nutritious. To top it off, the coconut pieces somehow remind me of Samoa Girl Scout cookies. You just have to try it to see what I mean. I could just be straight-up crazy.

I’ll be sure to post some pics of my new kitchen soon!

Maple Pecan Olive Oil Granola
Yield: About 7 cups
Recipe from Food52

  • 3 cups old-fashioned rolled oats
  • 1 cup raw pepitas (pumpkin seeds), hulled
  • 1 cup raw sunflower seeds, hulled
  • 1 cup unsweetened coconut chips (I got mine from Whole Foods)
  • 1 1/4 cup raw pecans, left whole or coarsely chopped
  • 3/4 cup pure maple syrup
  • 1/2 cup extra-virgin olive oil
  • 1/2 cup packed light-brown sugar
  • Coarse salt
  1. Heat oven to 300°F.
  2. Place oats, pumpkin seeds, sunflower seeds, coconut, pecans, syrup, olive oil, sugar, and 1 teaspoon salt in a large bowl and mix until well combined. Spread granola mixture in an even layer on a rimmed baking sheet. Transfer to oven and bake, stirring every 10-15 minutes, until granola is toasted, about 45 minutes.
  3. Remove granola from oven and season with more salt to taste. Let cool completely before serving or storing in an airtight container for up to 1 month.